jQuery Ajax를 이용한 post-it 메모장 만들기(생성, 확인)
- 기존에 배웠던 Ajax를 활용해 post-it 형식의 메모장을 만들어서 post-it 메모장 생성, 리스트 확인, 메모 작성, 메모 삭제 기능을 구현하기
- 우선 오늘은 post-it 메모장 생성(랜덤 위치)과 리스트 확인(새로고침 해도 원래 위치)을 구현을 해보자.
[ 환경설정 및 파일 생성 ]
- 기존의 Ajax수업의 프로젝트 환경설정과 동일하며, 파일 생성만 따로 추가하도록 하자
[ Controller ]
com.test.ajax > MemoController.java
              > MemoDAO.java
              > MemoDTO.java
com.test.ajax.mapper > ajax.xml

[ View ]
views > memo > index.jsp

[ Database ]
tblAjaxMemo 생성
(seq, id, memo, regdate, left, top, background, zindex)

[ image ]
포스트잇 형식의 이미지 파일 6개
[ DB 테이블 생성 ]
create table tblAjaxMemo (
    seq number primary key,                 -- 번호
    id varchar2(10) not null,               -- 아이디
    memo varchar2(1000) null,               -- 메모
    regdate date default sysdate not null,  -- 작성시간
    left number default 0 not null,         -- 좌표(x)
    top number default 0 not null,          -- 좌표(y)
    background varchar2(2) not null,        -- 배경
    zindex number default 0 not null        -- z-index
);

create sequence seqAjaxMemo;
[ MemoController.java ]
- 메모장 생성 작업을 진행했을 때 새로고침 하더라도 그 상태로 남아 있게끔 페이지 초기화 작업(DB작업)을 하여 기존 메모를 뷰에 넘겨준다.
- 메모장 생성 작업 시 DB작업(insert)를 한다.
@Controller
public class MemoController {

    @Autowired
    private AjaxDAO dao;

    @RequestMapping(value = "/memo/index.action", method = { RequestMethod.GET })
    public String memoindex(HttpServletRequest req, HttpServletResponse resp, HttpSession session) {

         // 페이지 초기화 작업
         int no = dao.getMaxNo();          // 마지막 id 찾기
         int back = dao.getMaxBack();      // 마지막 이미지 찾기
         int zindex = dao.getMaxZIndex();  // 마지막 z-index찾기

         // 기존 메모 가져오기
         List<MemoDTO> list = dao.listMemo();

         req.setAttribute("no", no);
         req.setAttribute("back", back);
         req.setAttribute("zindex", zindex);

         req.setAttribute("list", list);

         return "memo/index";
    }

    @RequestMapping(value = "/memo/add.action", method = { RequestMethod.POST })
    @ResponseBody
    public int add(HttpServletRequest req, HttpServletResponse resp, HttpSession session, MemoDTO dto) {
        int result = dao.addMemo(dto);
        return result;
    }
}
[ MemoDAO.java ]
@Repository
public class MemoDAO {

    @Autowired
    private SqlSessionTemplate template;

    public int addMemo(MemoDTO dto) {
        return template.insert("ajax.addMemo", dto);
    }

    public int getMaxNo() {
        return template.selectOne("ajax.getMaxNo");
    }

    public int getMaxBack() {
        return template.selectOne("ajax.getMaxBack");
    }

    public int getMaxZIndex() {
        return template.selectOne("ajax.getMaxZIndex");
    }

    public List<MemoDTO> listMemo() {
        return template.selectList("ajax.listMemo");
    }

}
[ MemoDTO.java ]
@Data
public class MemoDTO {

    private String seq;
    private String id;
    private String memo;
    private String regdate;
    private String left;
    private String top;
    private String background;
    private String zindex;

}
[ ajax.xml ]
- DB 쿼리 작성
<mapper namespace="ajax">

	<!-- 작성하기 -->
	<insert id="addMemo" parameterType="com.test.ajax.MemoDTO">
		insert into tblAjaxMemo (seq, id, memo, regdate, left, top, background, zindex)
			values (seqAjaxMemo.nextVal, #{id}, null, default, #{left}, #{top}, #{background}, default)
	</insert>

	<!-- id 최대값 구하기 -->
	<!-- nvl: 널이면 0 아니면 그냥 현재값.. -->
	<select id="getMaxNo" resultType="Integer">
		select nvl(substr(max(id), 2), 0) from tblAjaxMemo
	</select>

	<!-- background 최대값 구하기 -->
	<select id="getMaxBack" resultType="Integer">
		select nvl(substr(max(background), 2), 0) from tblAjaxMemo
			where id = (select max(id) from tblAjaxMemo)
	</select>

	<!-- zindex 최대값 구하기 -->
	<select id="getMaxZIndex" resultType="Integer">
		select nvl(max(zindex), 0) from tblAjaxMemo
	</select>

	<!-- 목록 확인 -->
	<select id="listMemo" resultType="com.test.ajax.MemoDTO">
		select * from tblAjaxMemo order by seq desc
	</select>

</mapper>
[ index.jsp ]
1) CSS
<style>

	.page-header {
		margin: 30px;
	}

	.memo {
		background-size: 100% 100%;
		width: 200px;
		height: 200px;
	}

	.memo .btnClose {
		width: 10px;
		color: white;
		cursor: pointer;
		float: right;
		margin-top: 5px;
		margin-right: 18px;
	}

	.memo .txtMemo {
		margin-left: 5px;
		margin-top: 10px;
		width: 180px;
		height: 150px;
		resize: none;
		border: 0;
		outline: none;
		background-color: transparent;
	}

	.memo .txtMemo::-webkit-scrollbar {
    	width: 10px;
  	}
  	.memo .txtMemo::-webkit-scrollbar-thumb {
    	background-color: #FFF;
    	border-radius: 10px;
	    background-clip: padding-box;
	    border: 2px solid transparent;
 	 }
  	..memo .txtMemo::-webkit-scrollbar-track {
    	background-color: grey;
    	border-radius: 10px;
    	box-shadow: inset 0px 0px 5px white;
  	}


</style>
2) HTML
<h1 class="page-header">Memo <button type="button" id="addMemo" class="btn btn-default"><span class="glyphicon glyphicon-plus">
    memo</span></button></h1>
3) Script (jQuery Ajax)
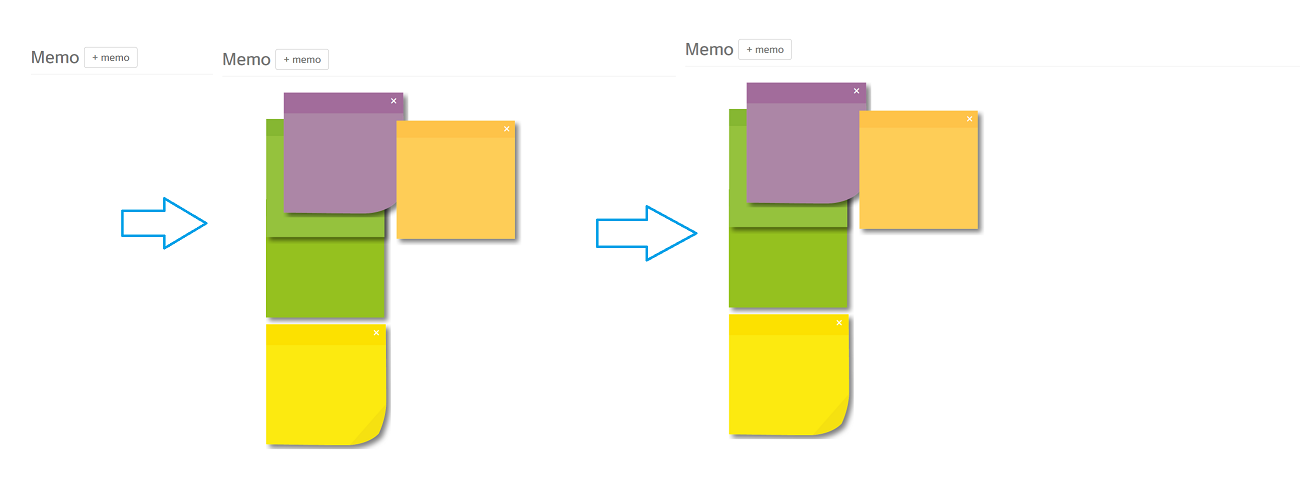
- 메모장 생성 시 여러개가 겹칠 수도 있으므로, 클릭 시 클릭한(mousedown) 메모장을 맨 앞으로 가져오는 jquery와 새로고침을 하더라도 그 위치에 그대로 남아있는 list를 controller에서 받아와 출력해준다.
let no = ${no + 1}; // id값
let back = ${back + 1}; // 이미지 파일명
let zindex = ${zindex + 1}; // 클릭한 postit 가장 앞으로
// 1. 버튼 클릭시 새 메모 추가하기
$('#addMemo').click(function() {
// 이미지 파일(background)이 총 6개 이므로..
if (back > 6) back = 1;
// post-it 위치를 화면 내에 무작위로 배치하기
let left = Math.random() * $(document).width() - 250;
if (left < 100) left = 100;
let top = Math.random() * $(document).height() - 250;
if ( top < 100) top = 100;
// 화면에 메모지 1개 추가하기
$('body').append('<div class="memo" id="m' + no + '" style="background-image: url(/ajax/resources/images/0' + back + '.png);" data-back="0' + back + '"><div class="btnClose">×</div><textarea class="txtMemo" ></textarea></div>')
.children()
.last()
.draggable()
.css('position', 'absolute') // 메모객체
.css('left', left + 'px')
.css('top', top + 'px')
.mousedown(function() { // 메모객체
$(this).css('z-index', zindex);
zindex++;
})
.find('.btnClose').click(function() { // 메모객체의 닫기버튼
$(this).parent().remove();
});
// 2. 새로 추가된 메모의 정보를 DB에 전송 + Ajax 사용
$.ajax({
type: 'POST',
url: '/ajax/memo/add.action',
data: 'id=m' + no + '&background=0' + back + '&left=' + left + '&top=' + top + '&zindex=0',
dataType: 'json',
success: function(result) {
// 메모 추가 성공 유무 확인용
if (result == 1) { }
else {}
},
error: function(a, b, c) {
console.log(a, b, c);
}
});
no++;
back++;
});
<c:forEach items="${list}" var="dto">
$('body').append('<div class="memo" id="${ dto.id }' + no + '" style="background-image: url(/ajax/resources/images/${ dto.background }.png); z-index:${ dto.zindex };" data-back="${ dto.background }"><div class="btnClose">×</div><textarea class="txtMemo" ></textarea></div>')
.children()
.last()
.draggable()
.css('position', 'absolute') // 메모객체
.css('left', '${ dto.left }px')
.css('top', '${ dto.top }px')
.mousedown(function() { // 메모객체
$(this).css('z-index', zindex);
zindex++;
})
.find('.btnClose').click(function() { // 메모객체의 닫기버튼
$(this).parent().remove();
});
</c:forEach>
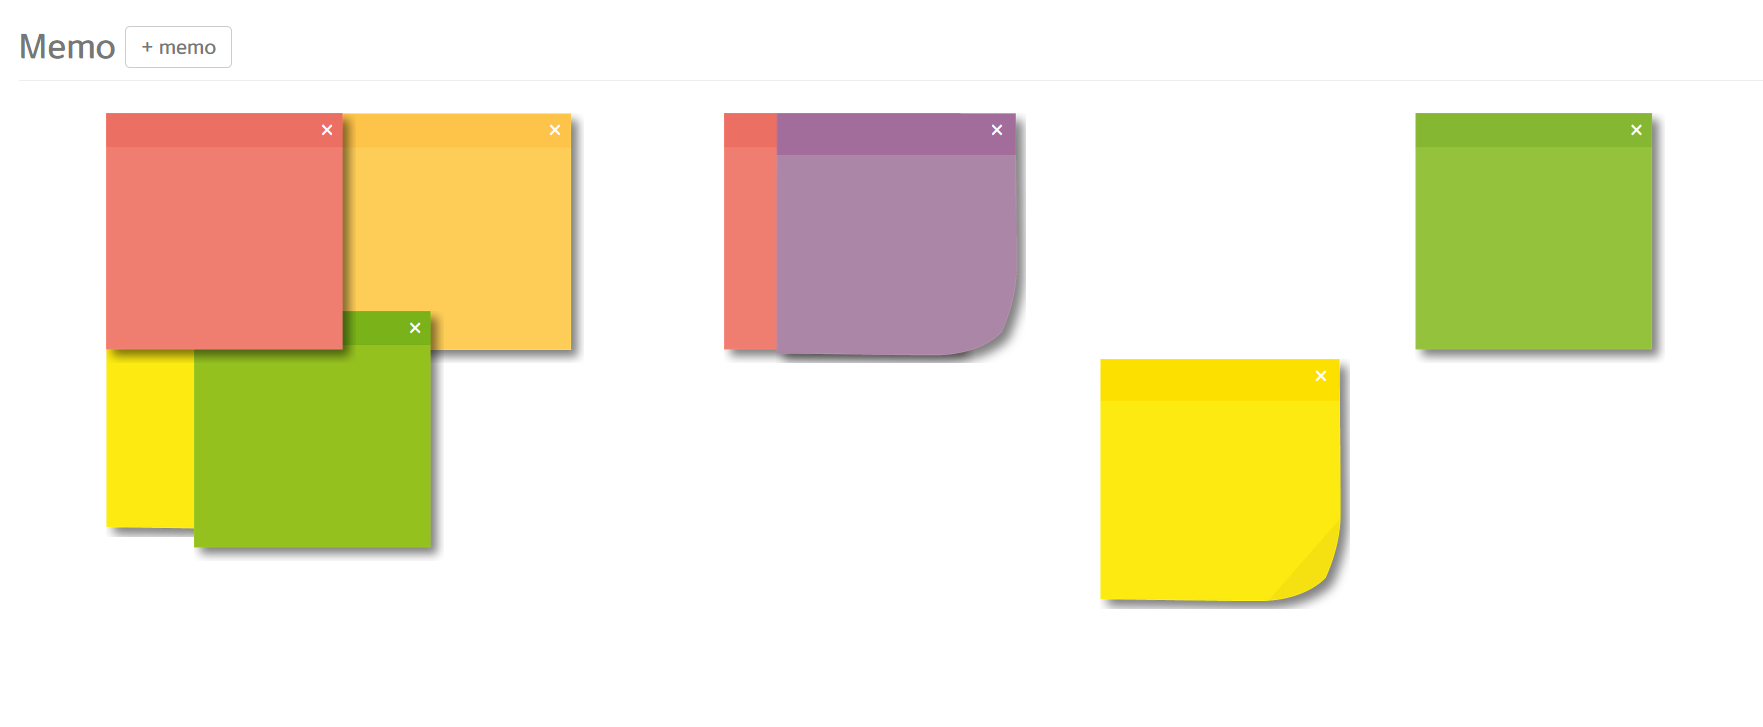
[ 결과 화면 ]
- post-it 생성은 미리 준비한 이미지파일 6개가 순차적으로 생성되며 새로고침 후 다시 버튼을 클릭 해 생성 하더라도 그 다음 post-it 색상이 추가되는것을 확인할 수 있다.
'교육 > Spring' 카테고리의 다른 글
| Spring 개발자 수업 110일차(1) - RESTful API (0) | 2021.09.02 |
|---|---|
| Spring 개발자 수업 109일차 - jQuery Ajax를 이용한 post-it 메모장 만들기(작성, 위치 저장, 삭제) (0) | 2021.08.31 |
| Spring 개발자 수업 107일차 - 휴강 (0) | 2021.08.28 |
| Spring 개발자 수업 105일차(2) - jQuery Ajax를 이용한 아이디 중복검사 (0) | 2021.08.26 |
| Spring 개발자 수업 105일차(1) - jQuery Ajax를 이용한 데이터 가져오기/보내기 (0) | 2021.08.25 |


댓글