웹 소켓(Web Socket)
[ 정의 ]
- 웹소켓은 하나의 TCP 접속에 전이중 통신 채널을 제공하는 컴퓨터 통신 프로토콜이다.
- HTML5 표준 기술로, 사용자의 브라우저와 서버 사이의 동적인 양방향 연결 채널을 구성한다.
- Websocket API를 통해 서버로 메세지를 보내고, 요청 없이 응답을 받아오는 것이 가능하다.
[ 웹 소켓을 쓰는 이유? ]
- 실시간 채팅 기능을 구현하기 위해서는 http통신의 기존 방법으로는 한계가 있다.
- 동작 단계를 보며 문제점을 찾아보자.
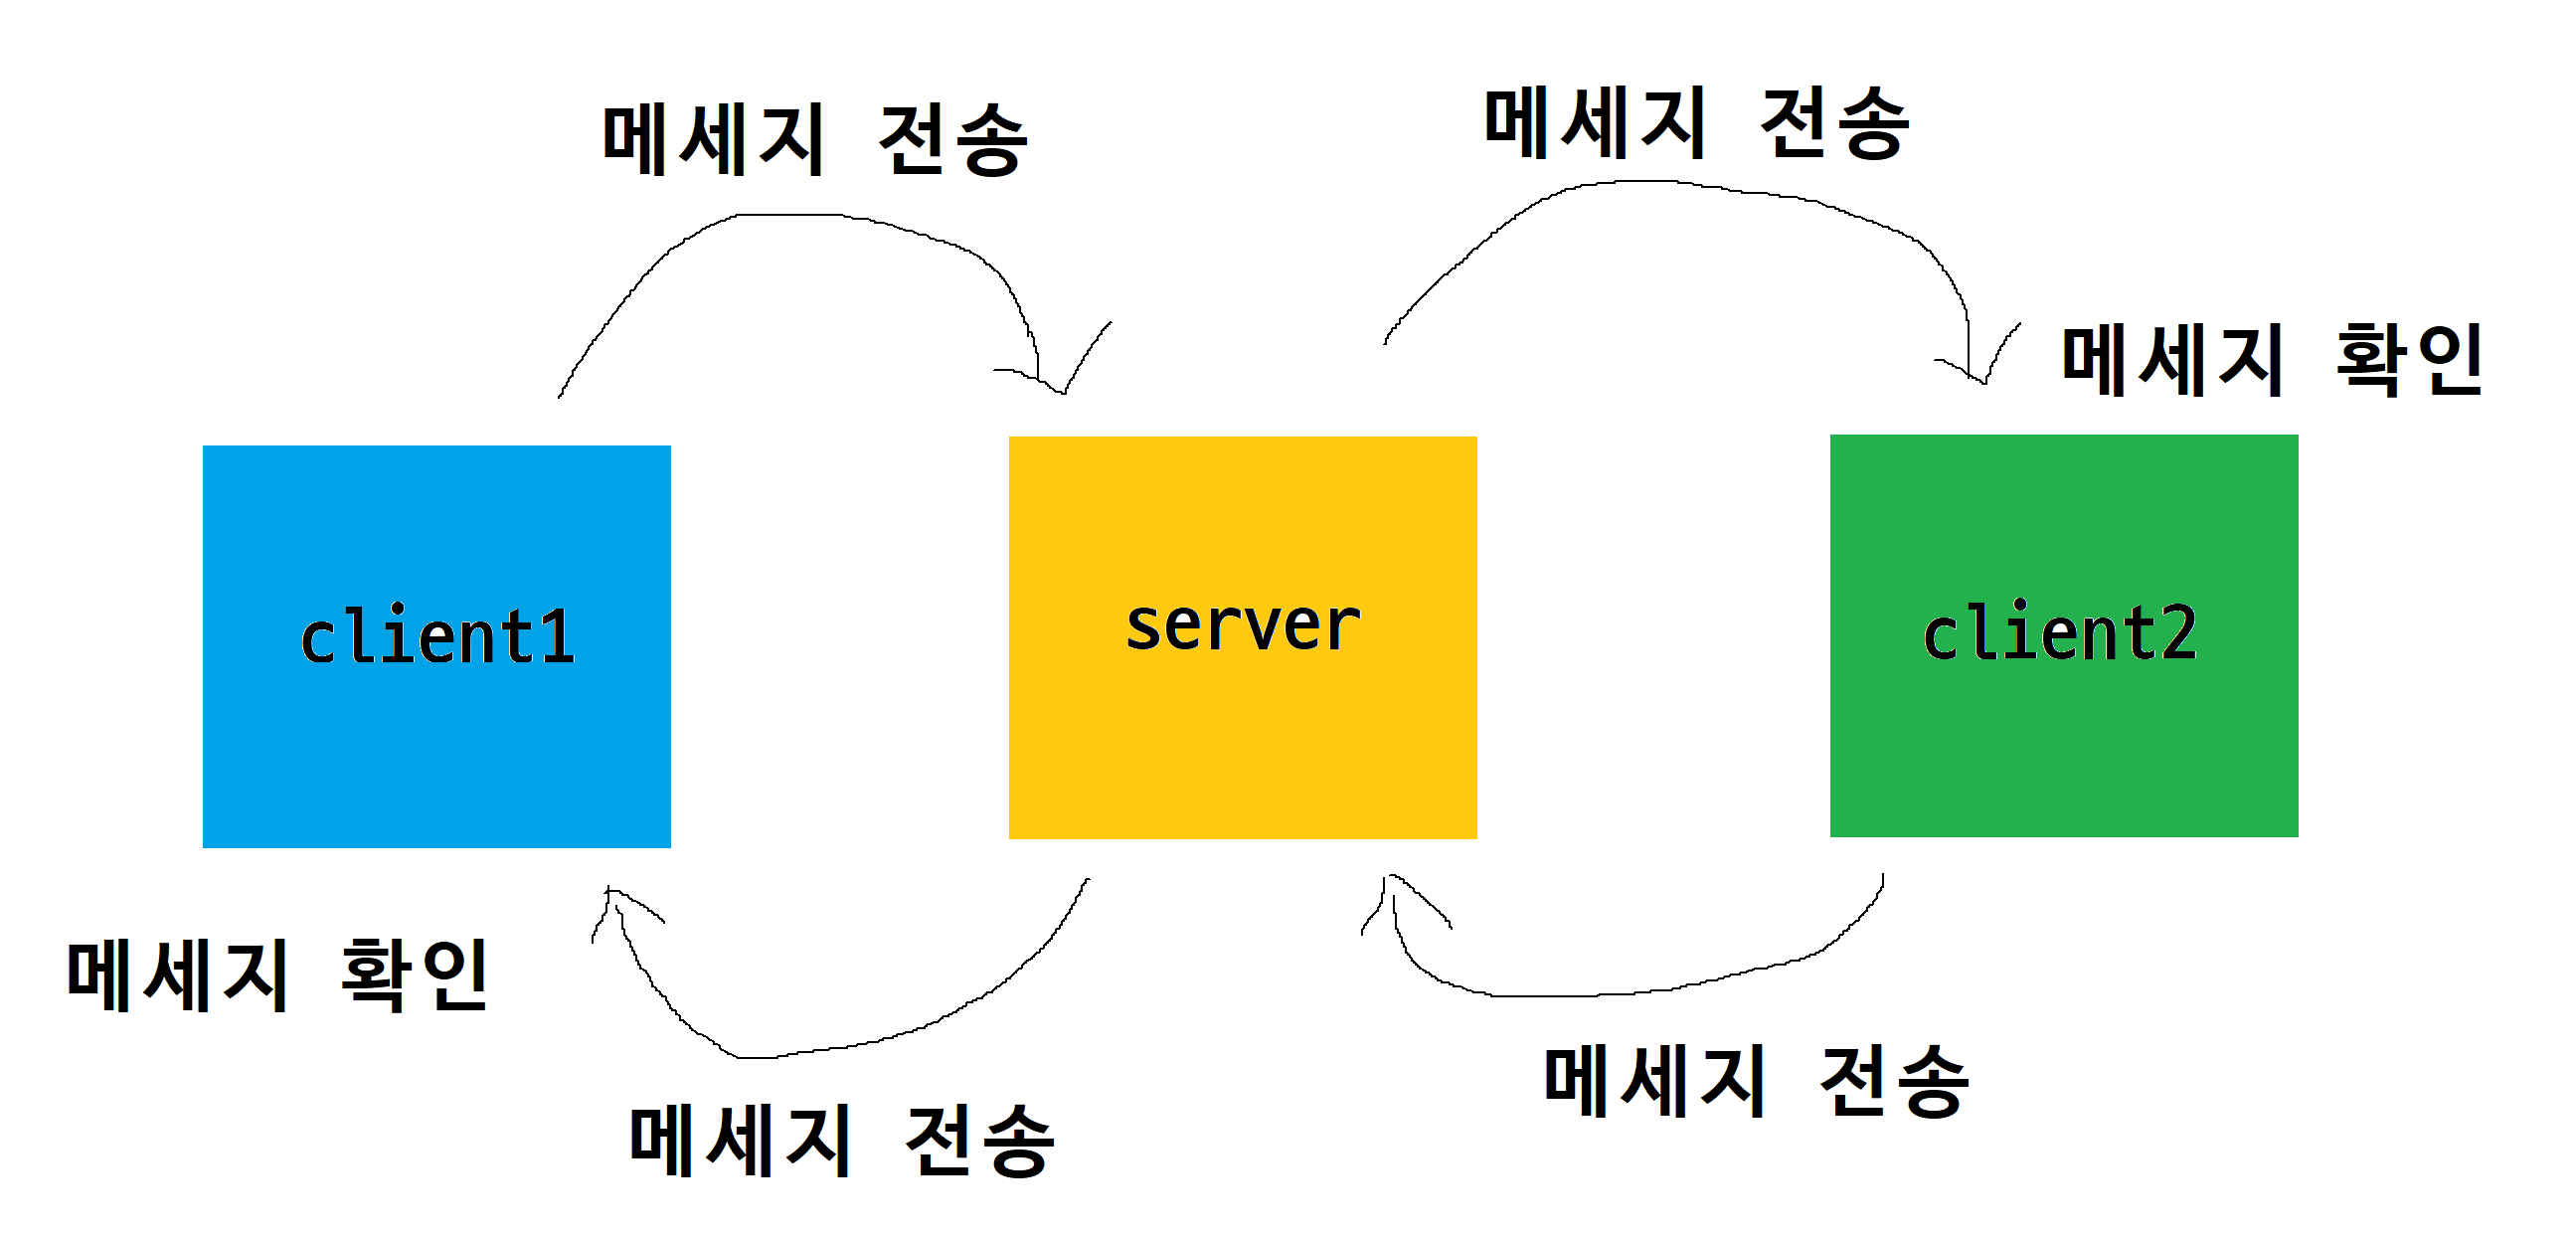
- 1단계: client1이 server에게 메세지를 전송한다
- 2단계: server는 그 메세지를 client2에게 전송한다.
- 3단계: client2는 자신에게 온 메세지를 확인한다.
3단계로 이루어진 아주 간단한 과정이지만 여기서 하나의 문제가 있다. 기본적으로 http통신이란 client가 요청을 해야 server가 응답하는 방식이고, server가 client2에게 메세지가 도착했다는 것을 알리려 해도, client2에게서 request가 없었기 때문에 server가 일방적으로 response를 할 수 없는 것이다.
client2의 입장에서 생각해 봐도 자신의 독립된 환경에서 메세지가 도착했는지, 안했는지 판단할 수 없기때문에 server에 자신에게 온 메세지의 데이터를 전송해달라고 request를 보낼 수가 없다.
[ Spring에서 웹 소켓 사용 설정 및 작업 파일 ]
1) pom.xml
- 의존성 추가하기
- spring-websocket은 spring에서 웹 소켓 기능을 사용할 수 있게 해준다.
- json은 웹 소켓에서 json형식으로 데이터를 주고받기 때문에 추가해야한다.
<!-- JSON -->
<dependency>
	<groupId>com.googlecode.json-simple</groupId>
  	<artifactId>json-simple</artifactId>
  	<version>1.1.1</version>
</dependency>

<!-- WebSocket -->
<dependency>
   	<groupId>org.springframework</groupId>
	<artifactId>spring-websocket</artifactId>
	<version>${org.springframework-version}</version>
</dependency>

<dependency>
	<groupId>javax.websocket</groupId>
	<artifactId>javax.websocket-api</artifactId>
    <version>1.1</version>
</dependency>
2) 작업 파일
<작업파일>

- ChatController.java
- ChatServer.java

- chat.jsp
[ ChatController.java ]
- 컨트롤러는 JSP호출(chat.jsp)을 위한 용도라서 사실상 의미가 없다. 중요한건 Server이다.
@Controller
public class ChatController {
	@RequestMapping(value = "/chat.action", method = { RequestMethod.GET })
	public String chat (HttpServletRequest req, HttpServletResponse resp, HttpSession session) {
		return "chat";
	}
}
[ ChatServer.java ]
- 메시지를 받고, 전송하는 Server
- 여기에서 Session 은 기존 우리가 알던 Session과 다르지만 비슷하다. ( client 정보를 가지고 있다.)
- 클라이언트 정보를 가지고 있는 Session에 static을 붙여줘야한다.
@ServerEndpoint("/chatserver")
public class ChatServer {

	// 현재 채팅 서버에 접속한 클라이언트(WebSocket Session) 목록
	// static 붙여야함!!
	private static List<Session> list = new ArrayList<Session>();

	private void print(String msg) {
		System.out.printf("[%tT] %s\n", Calendar.getInstance(), msg);
	}

	@OnOpen
	public void handleOpen(Session session) {
		print("클라이언트 연결");
		list.add(session); // 접속자 관리(****)
	}

	@OnMessage
	public void handleMessage(String msg, Session session) {

		// 로그인할 때: 1#유저명
		// 대화  할 때: 2유저명#메세지
		int index = msg.indexOf("#", 2);
		String no = msg.substring(0, 1);
		String user = msg.substring(2, index);
		String txt = msg.substring(index + 1);

		if (no.equals("1")) {
			// 누군가 접속 > 1#아무개
			for (Session s : list) {
				if (s != session) { // 현재 접속자가 아닌 나머지 사람들

					try {
						s.getBasicRemote().sendText("1#" + user + "#");
					} catch (IOException e) {
						e.printStackTrace();
					}

				}
			}

		} else if (no.equals("2")) {
			// 누군가 메세지를 전송
			for (Session s : list) {

				if (s != session) { // 현재 접속자가 아닌 나머지 사람들
					try {
						s.getBasicRemote().sendText("2#" + user + ":" + txt);
					} catch (IOException e) {
						e.printStackTrace();
					}

				}

			}
		} else if (no.equals("3")) {
			// 누군가 접속 > 3#아무개
			for (Session s : list) {

				if (s != session) { // 현재 접속자가 아닌 나머지 사람들
					try {
						s.getBasicRemote().sendText("3#" + user + "#");
					} catch (IOException e) {
						e.printStackTrace();
					}
				}

			}
			list.remove(session);
		}

	}

	@OnClose
	public void handleClose() {

	}

	@OnError
	public void handleError(Throwable t) {

	}

}
[ chat.jsp ]
- HTML
<div class="container">
	<h1 class="page-header">Chat</h1>

	<table class="table table-bordered">
		<tr>
			<td><input type="text" name="user" id="user" class="form-control" placeholder="유저명"></td>
			<td>
				<button type="button" class="btn btn-default" id="btnConnect">연결</button>
				<button type="button" class="btn btn-default" id="btnDisconnect" disabled>종료</button>
			</td>
		</tr>
		<tr>
			<td colspan="2"><div id="list"></div></td>
		</tr>
		<tr>
			<td colspan="2"><input type="text" name="msg" id="msg" placeholder="대화 내용을 입력하세요." class="form-control" disabled></td>
		</tr>
	</table>

</div>
- CSS
.container {
	width: 500px;
}

#list {
	height: 300px;
	padding: 15px;
	overflow: auto;
}
- Script
// 채팅 서버 주소
let url = "ws://localhost:8090/spring/chatserver";

// 웹 소켓
let ws;

// 연결하기
$('#btnConnect').click(function() {

	// 유저명 확인
   	if ($('#user').val().trim() != '') {
   		// 연결
	   	ws = new WebSocket(url);

	   	// 소켓 이벤트 매핑
	   	ws.onopen = function (evt) {
	   		// console.log('서버 연결 성공');
	   		print($('#user').val(), '입장했습니다.');

	   		// 현재 사용자가 입장했다고 서버에게 통지(유저명 전달)
	   		// -> 1#유저명
			ws.send('1#' + $('#user').val() + '#');

			$('#user').attr('readonly', true);
			$('#btnConnect').attr('disabled', true);
			$('#btnDisconnect').attr('disabled', false);
			$('#msg').attr('disabled', false);
			$('#msg').focus();
		};

		ws.onmessage = function (evt) {
			// print('', evt.data);
			let index = evt.data.indexOf("#", 2);
			let no = evt.data.substring(0, 1);
			let user = evt.data.substring(2, index);
			let txt = evt.data.substring(index + 1);

			if (no == '1') {
				print2(user);
			} else if (no == '2') {
				print(user, txt);
			} else if (no == '3') {
				print3(user);
			}
			$('#list').scrollTop($('#list').prop('scrollHeight'));
		};

		ws.onclose = function (evt) {
			console.log('소켓이 닫힙니다.');
		};

		ws.onerror = function (evt) {
			console.log(evt.data);
		};
	} else {
		alert('유저명을 입력하세요.');
		$('#user').focus();
	}
});

// 메세지 전송 및 아이디
function print(user, txt) {
	let temp = '';
	temp += '<div style="margin-bottom:3px;">';
	temp += '[' + user + '] ';
	temp += txt;
	temp += ' <span style="font-size:11px;color:#777;">' + new Date().toLocaleTimeString() + '</span>';
	temp += '</div>';

	$('#list').append(temp);
}

// 다른 client 접속
function print2(user) {
	let temp = '';
	temp += '<div style="margin-bottom:3px;">';
	temp += "'" + user + "' 이(가) 접속했습니다." ;
	temp += ' <span style="font-size:11px;color:#777;">' + new Date().toLocaleTimeString() + '</span>';
	temp += '</div>';

	$('#list').append(temp);
}

// client 접속 종료
function print3(user) {
	let temp = '';
	temp += '<div style="margin-bottom:3px;">';
	temp += "'" + user + "' 이(가) 종료했습니다." ;
	temp += ' <span style="font-size:11px;color:#777;">' + new Date().toLocaleTimeString() + '</span>';
	temp += '</div>';

	$('#list').append(temp);
}

$('#user').keydown(function() {
	if (event.keyCode == 13) {
		$('#btnConnect').click();
	}
});


$('#msg').keydown(function() {
	if (event.keyCode == 13) {

		//서버에게 메시지 전달
		//2#유저명#메시지
		ws.send('2#' + $('#user').val() + '#' + $(this).val()); //서버에게
		print($('#user').val(), $(this).val()); //본인 대화창에

        $('#msg').val('');
		$('#msg').focus();

	}
});

$('#btnDisconnect').click(function() {
	ws.send('3#' + $('#user').val() + '#');
	ws.close();

	$('#user').attr('readonly', false);
    $('#user').val('');

	$('#btnConnect').attr('disabled', false);
	$('#btnDisconnect').attr('disabled', true);

	$('#msg').val('');
	$('#msg').attr('disabled', true);
});
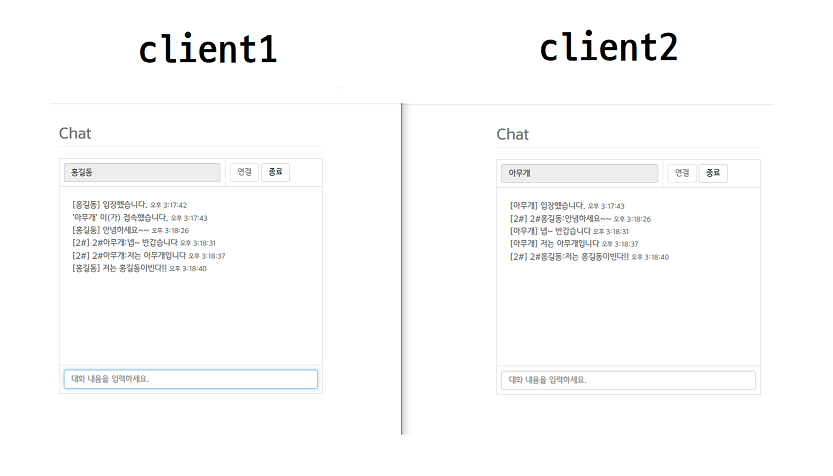
[ 구현 화면 ]
- client1이 먼저 로그인하고, client2가 로그인 했을 때 발생하는 이벤트
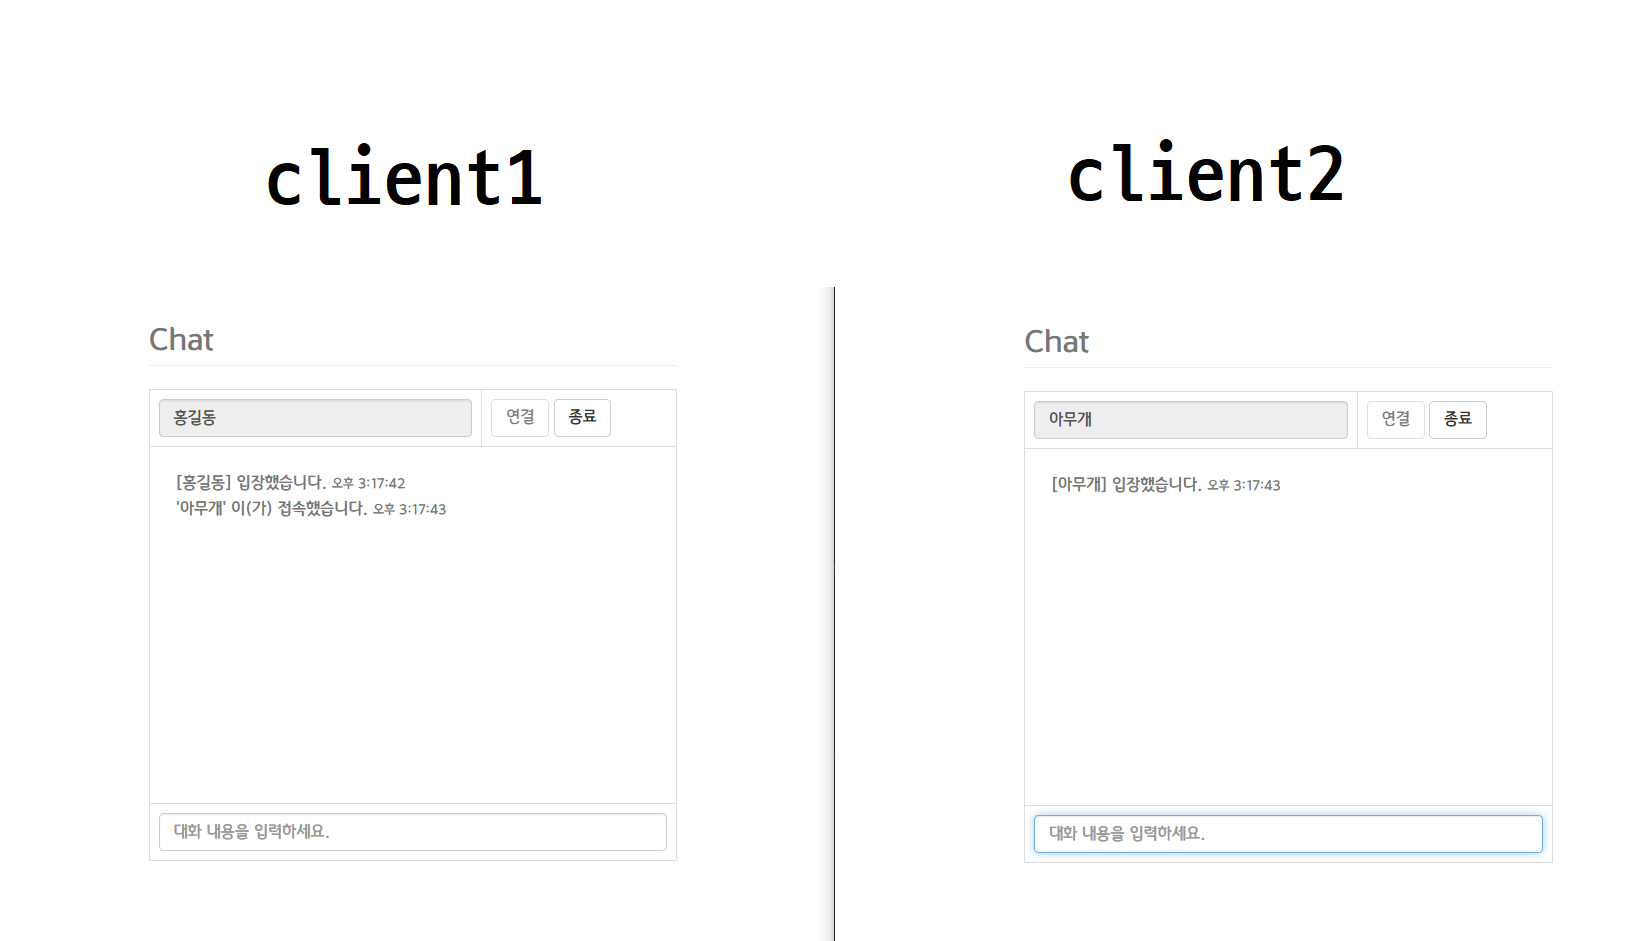
- 실시간 채팅
MEMO>
# 오늘 배운 웹 소켓은 아주 기초적인 내용을 겉핥기 식으로 배운것이다. 깊게 공부하면 굉장히 어려운 분야임...
(but 오늘 배운 것도 나에게는 어렵다.)
# 웹 소켓을 사용해서 마지막 프로젝트에 적용하기
# 자바스크립트 부분이 역시 부족한거같다.
'교육 > Spring' 카테고리의 다른 글
| Spring 개발자 수업 104일차 - jQuery Ajax, 동기와 비동기 방식 (0) | 2021.08.24 |
|---|---|
| Spring 개발자 수업 103일차 - Ajax (0) | 2021.08.23 |
| Spring 개발자 수업 101일차 - 코드 게시판 만들기(상세 보기, 댓글 작성) (0) | 2021.08.19 |
| Spring 개발자 수업 100일차 - 코드 게시판 만들기(글 보기, 글 쓰기) (0) | 2021.08.19 |
| Spring 개발자 수업 99일차 - AOP 적용한 게시판 만들기 (0) | 2021.08.17 |


댓글