기본 게시판 만들기
- OpenAPI를 이용하여 책 검색하기
OpenAPI를 이용하여 책 검색하기
[ 구현 목표 ]
- 찾고자 하는 책 제목으로 검색할 수 있다.
- 총 몇개가 검색됬는지 확인할 수 있다.
- 검색된 책 리스트의 갯수를 조절할 수 있다.
- 검색된 책 리스트 중 제목을 클릭 하면 해당 책의 구매 사이트로 이동한다.
[ OpenAPI 준비 작업 ]
- 네이버 OpenAPI: https://developers.naver.com/main/
NAVER Developers
네이버 오픈 API들을 활용해 개발자들이 다양한 애플리케이션을 개발할 수 있도록 API 가이드와 SDK를 제공합니다. 제공중인 오픈 API에는 네이버 로그인, 검색, 단축URL, 캡차를 비롯 기계번역, 음
developers.naver.com
- json 도움: https://mvnrepository.com/artifact/com.googlecode.json-simple/json-simple/1.1.1
[ 네이버 OpenAPI ]
1. 네이버 개발자 센터 접속
2. 메인 화면에서 서비스API 클릭
3. 카테고리에서 "검색" 항목 클릭 후 "개발 가이드 보기" 클릭
4. 카테고리에서 "책" 항목 클릭 후 "OpenAPI 신청" 클릭

[ Servlet ]
com.test.myapp.book 패키지 생성
	-> Book.java

[ JSP ]
WEB-INF > views > book 폴더 생성
	-> book.jsp

[ json ] -> 보기힘든 json 코드를 가지런히 정리해준다.
WEB-INF > lib
	-> json-simple-1.1.jar
[ Servet 작업 ]
- 검색어 가져오기
- OpenAPI 요청 > 결과 반환(JSON)
- JSON 분석 > Java 형태로 변환
- 결과 전달 + JSP 호출하기
@WebServlet("/book/book.do")
public class Book extends HttpServlet {

	@Override
	protected void doGet(HttpServletRequest req, HttpServletResponse resp) throws ServletException, IOException {

		// 1. 검색어 가져오기
		String query = req.getParameter("query");

		if ( query != null && !query.equals("")) {

			// 2. OpenAPI 요청 > 결과 반환(JSON)
			String result = getJSON(query);

			// 3. JSON 분석 > 자바 형태로 변환
			JSONParser parser = new JSONParser();

			try {

				JSONObject obj = (JSONObject)parser.parse(result);

				// total: 검색된 책의 총 개수
				// System.out.println(obj.get("total"));
				req.setAttribute("total", obj.get("total").toString());

				// 4. 결과 전달 + JSP 호출하기
				JSONArray list = (JSONArray) obj.get("items");

				req.setAttribute("list", list);

			} catch (ParseException e) {
				e.printStackTrace();
			}

		}

		RequestDispatcher dispatcher = req.getRequestDispatcher("/WEB-INF/views/book/book.jsp");
		dispatcher.forward(req, resp);

	}


	 private static String getJSON(String query) {

	      String clientId = "a34JFRX5_gHUoOzHkiWh"; // 애플리케이션 클라이언트 아이디값"
	      String clientSecret = "oRWIyk0p0P"; // 애플리케이션 클라이언트 시크릿값"

	      String text = null;

	      try {
	         text = URLEncoder.encode(query, "UTF-8");
	      } catch (UnsupportedEncodingException e) {
	         throw new RuntimeException("검색어 인코딩 실패", e);
	      }

	      // json 결과
	      String apiURL = "https://openapi.naver.com/v1/search/book.json?query=" + text + "&display=50&start=11";

	      // xml 결과
	      //String apiURL = "https://openapi.naver.com/v1/search/blog.xml?query="+ text;


	      Map<String, String> requestHeaders = new HashMap<>();
	      requestHeaders.put("X-Naver-Client-Id", clientId);
	      requestHeaders.put("X-Naver-Client-Secret", clientSecret);
	      String responseBody = get(apiURL, requestHeaders);

	      //System.out.println(responseBody); //출력!!!

	      return responseBody;

	   }


	   private static String get(String apiUrl, Map<String, String> requestHeaders) {
	      HttpURLConnection con = connect(apiUrl);
	      try {
	         con.setRequestMethod("GET");
	         for (Map.Entry<String, String> header : requestHeaders.entrySet()) {
	            con.setRequestProperty(header.getKey(), header.getValue());
	         }

	         int responseCode = con.getResponseCode();
	         if (responseCode == HttpURLConnection.HTTP_OK) { // 정상 호출
	            return readBody(con.getInputStream());
	         } else { // 에러 발생
	            return readBody(con.getErrorStream());
	         }
	      } catch (IOException e) {
	         throw new RuntimeException("API 요청과 응답 실패", e);
	      } finally {
	         con.disconnect();
	      }
	   }

	   private static HttpURLConnection connect(String apiUrl) {
	      try {
	         URL url = new URL(apiUrl);
	         return (HttpURLConnection) url.openConnection();
	      } catch (MalformedURLException e) {
	         throw new RuntimeException("API URL이 잘못되었습니다. : " + apiUrl, e);
	      } catch (IOException e) {
	         throw new RuntimeException("연결이 실패했습니다. : " + apiUrl, e);
	      }
	   }

	   private static String readBody(InputStream body) {
	      InputStreamReader streamReader = new InputStreamReader(body);

	      try (BufferedReader lineReader = new BufferedReader(streamReader)) {
	         StringBuilder responseBody = new StringBuilder();

	         String line;
	         while ((line = lineReader.readLine()) != null) {
	            responseBody.append(line);
	         }

	         return responseBody.toString();
	      } catch (IOException e) {
	         throw new RuntimeException("API 응답을 읽는데 실패했습니다.", e);
	      }
	   }
}
-> 코드가 다소 복잡해보이지만 전부 네이버 책 검색 Document를 참고해서 복사해온 것이므로, Servlet 파일에서 유심히 봐야할 것은 doGet 안의 코드와 getJSON 메소드 안에 있는 String apiURL 값만 자세히 확인하면 된다.
[ JSP 작업 - 검색 결과 만들기 ]
- 서블릿에서 넘어온 JSONArray list를 JSP에서 c:forEach를 사용해 각 image, link, title, author, publisher, price, discount 불러오기
- 검색 전에는 c:if를 사용해 검색 결과(table)를 입력하게끔 멘트 띄우기
- 검색 후에는 c:if를 사용해 검색 결과(table)를 출력하기
<%@ page language="java" contentType="text/html; charset=UTF-8" pageEncoding="UTF-8"%>
<%@ taglib prefix="c" uri="http://java.sun.com/jsp/jstl/core" %>
<%@ taglib prefix="fmt" uri="http://java.sun.com/jsp/jstl/fmt" %>

<!DOCTYPE html>
<html>
<head>
<meta charset="UTF-8">
<title>myapp</title>

<%@ include file="/inc/asset.jsp" %>

<style>
	.table th:nth-child(1) { width: 120px; }
	.table th:nth-child(2) { width: auto; }
	.table th:nth-child(3) { width: 100px; }
	.table th:nth-child(4) { width: 110px; }
	.table th:nth-child(5) { width: 100px; }
</style>

</head>
<body>
	<!-- template.jsp > book.jsp -->
	<%@ include file="/inc/header.jsp" %>

	<section class="main-section">

		<h1>OpenAPI <small>네이버 책 검색</small></h1>

		<div class="well">
			<form method="GET" action="/myapp/book/book.do">
			<!-- <form>내에 텍스트 박스가 1개만 존재하면 그 텍스트 박스에서 엔터를 치면 submit 기능이 동작된다. -->
			<input type="text" name="query" class="form-control" placeholder="검색어를 입력하세요. " />
			</form>
		</div>

		<c:if test="${ not empty total }">
			<div class="alert alert-success">${ total }권이 책이 검색되었습니다.</div>
		</c:if>

		<table class="table table-bordered">
			<tr>
				<th>표지</th>
				<th>제목</th>
				<th>저자</th>
				<th>출판사</th>
				<th>가격</th>
			</tr>

			<c:if test="${ empty total }">
			<tr>
				<td colspan="5">검색어를 입력하세요.</td>
			</tr>
			</c:if>

			<c:if test="${ not empty total && total == 0 }">
			<tr>
				<td colspan="5">검색 결과가 없습니다.</td>
			</tr>
			</c:if>

			<c:if test="${ not empty total && total > 0 }">

				<c:forEach items="${ list }" var="book">
					<tr>
						<td><img src="${ book.image }"> </td>
						<td>
							<a href="${ book.link }" target="_blank">${ book.title }</a>
						</td>
						<td>${ book.author }</td>
						<td>${ book.publisher }</td>
						<td>
							<div style="text-decoration: line-through;">
								<fmt:formatNumber value="${ book.price }" maxFractionDigits="3" />원
							</div>
							<div>
								<fmt:formatNumber value="${ book.discount }" maxFractionDigits="3" />원
							</div>
						</td>
					</tr>
				</c:forEach>

			</c:if>

		</table>

	</section>

	<%@ include file="/inc/init.jsp" %>
</body>
</html>
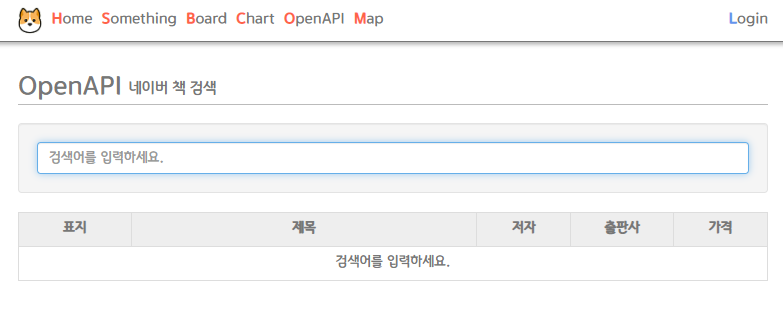
- 검색 전 페이지 ( http://localhost:8090/myapp/book/book.do )
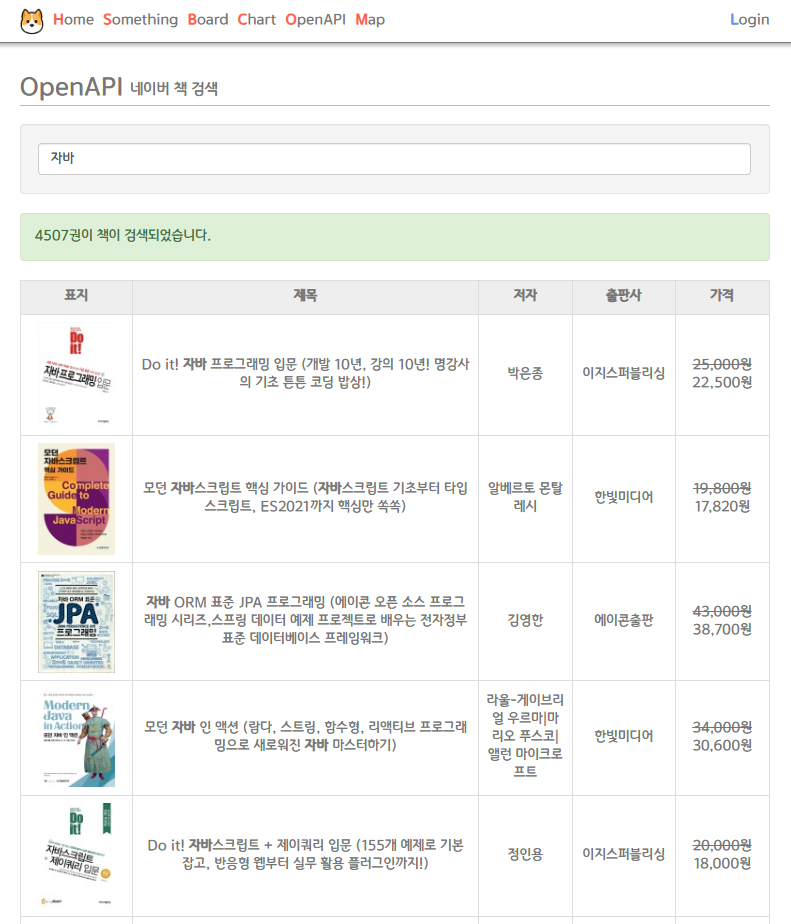
- 검색 후 페이지 ( http://localhost:8090/myapp/book/book.do?query=자바 )
MEMO>
# OpenAPI를 처음배웟는데 아직 뭐가 뭔지 모르지만 전부 알려고 하지말고 필요한 부분만 캐치해서 사용하자
# json파일은 한줄로 보여지는데 이를 정리해주는 사이트가 존재한다. -> 구글에서 json Parser 검색
# json Paser로 정리 후에 json파일에 어떤것이 존재하는지 먼저 파악하자.
# 현재 하고있는 웹 프로젝트에서도 OpenAPI중 하나를 선택해서 사용할 것 !!
'교육 > Server' 카테고리의 다른 글
| JDBC 개발자 수업 84일차 - 크롤링(crawling) (0) | 2021.07.28 |
|---|---|
| JDBC 개발자 수업 83일차 - 기본 게시판 만들기 - OpenAPI를 이용하여 지도 만들기 (0) | 2021.07.25 |
| JDBC 개발자 수업 82일차 - 기본 게시판 만들기(1) - OpenAPI를 이용하여 차트 추가하기 (0) | 2021.07.25 |
| JDBC 개발자 수업 81일차 - 기본 게시판 만들기(2) - 답변 기능 추가하기 (0) | 2021.07.22 |
| JDBC 개발자 수업 81일차 - 기본 게시판 만들기(1) - 페이징 기능 추가하기 (0) | 2021.07.22 |


댓글